
How to Choose, Set Up, and Train With a Floor-to-Ceiling Bag
Compare sizes, shapes, cords, anchors and total installed cost, then progress from light straight punches to combinations, defense and footwork.
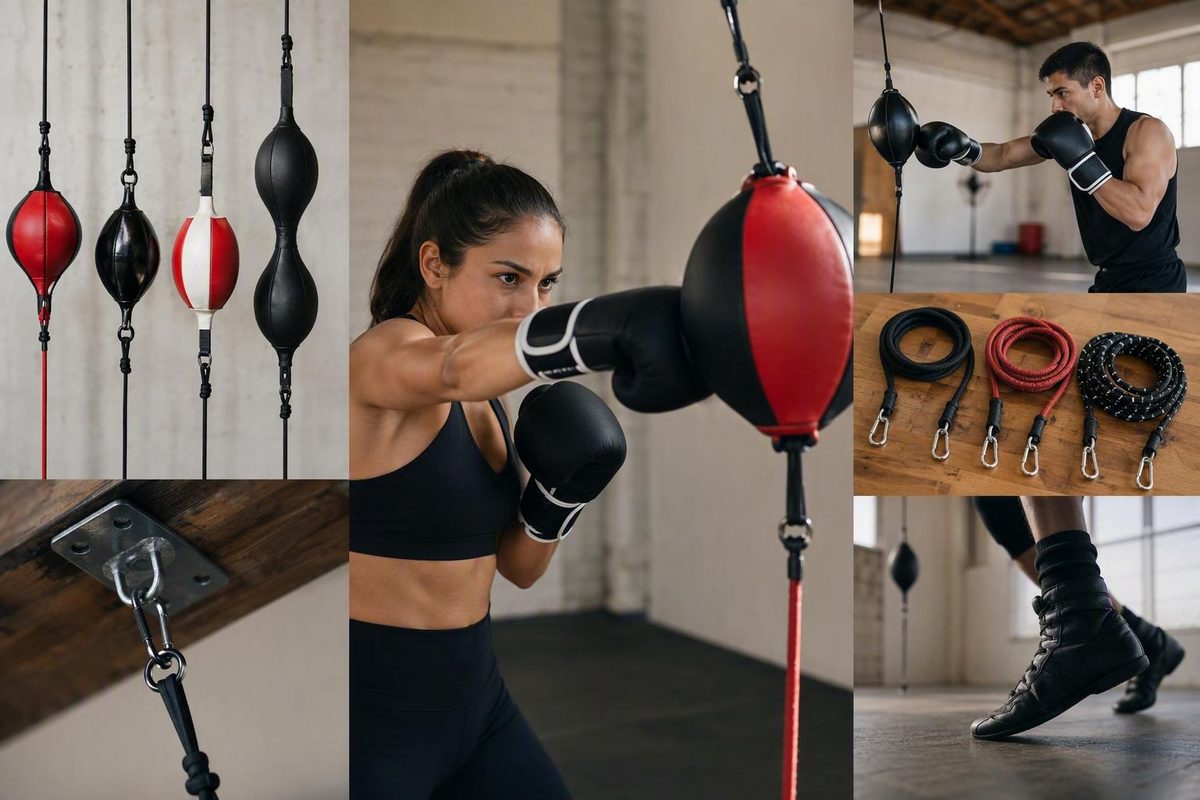
A double end bag—also called a floor-to-ceiling bag—is a moving target, not a smaller substitute for a heavy bag. It provides feedback that may make reaching, poor balance, late guard recovery, and uncontrolled footwork more noticeable, especially when a coach reviews the work.
Choosing one involves more than comparing bag prices. Target size, shape, cords, anchors, room clearance, adjustability, package contents, and replacement parts all affect whether the setup is practical. This guide explains those variables, shows how to estimate total installed cost, and provides a beginner progression from light straight punches to combinations, defense, and footwork.
Related: The Jab, Built From Stance Up.
What a double end bag is—and what it is for
Tension from both directions brings the target back toward its resting position after a strike.
Coaches and equipment sellers commonly use the bag for drills involving:
- Timing punches against a returning target
- Accuracy and controlled combinations
- Punching rhythm
- Guard recovery
- Slips, blocks, parries, and other defensive actions
- Angles and changes of position
- Footwork around a moving target
These are common training uses, not guaranteed outcomes. Repeatedly hitting a double end bag does not prove that a boxer will become faster, more accurate, or more effective in competition.
The defining feature is its feedback loop. You strike the target, it moves away, and its return creates the next timing, positioning, or defensive cue. You can meet it with another punch, let it pass, defend against its return, or reposition before continuing.
That feedback can make technical errors easier to notice. Reaching may pull your weight beyond your base. An off-center strike may send the target across an awkward line. A slow hand return may leave your guard open as the bag rebounds. The bag does not diagnose these errors by itself, however; knowledgeable observation remains valuable.
A double end bag is not primarily a maximum-power tool. Light, short contact is more useful when first learning its rhythm.
It is also not an opponent. It cannot choose to feint, change tactics, apply deliberate pressure, break its rhythm, or throw a genuine counter.
Bag-specific coordination may help you rehearse selected boxing actions, but proficiency on the equipment is not the same as applying those actions against another boxer.
Treat written guidance as supplemental education. Boxing Learn describes boxing as a contact sport with real risk and states that online material does not replace a coach or proper equipment. A qualified coach can assess stance, distance, defensive habits, and training intensity in ways that a general article cannot.
Double end bag vs. heavy bag, speed bag, and sparring
Each training tool creates a different problem. A double end bag is worth considering when its moving-target problem matches a gap in your training.
| Training mode | Target behavior | Practical role | What it does not provide |
|---|---|---|---|
| Double end bag | Moves through space and rebounds after contact | Moving-target control, timing, accuracy, guard recovery, defense, distance, and footwork | Heavy resistance or tactical decisions |
| Heavy bag | Comparatively static, although it may swing | Harder punches, committed combinations, sustained output, and work against resistance | Quick, compact rebounds toward the boxer |
| Platform speed bag | Rebounds against a platform in a relatively steady rhythm | Repetitive rhythm and hand sequencing | Free movement through the boxer’s space |
| Mitts | Controlled by a coach or partner | Technical correction, varied cues, planned combinations, and tactical instruction | Fully live opposition |
| Sparring | Another boxer observes, decides, attacks, and adapts | Live timing, pressure, decision-making, and tactical application | The predictable availability and lower complexity of solo equipment |
Some commercial descriptions claim that a double end bag combines the benefits of heavy and speed bags. That characterization is too broad. Its movement shares selected features with both, but it does not reproduce the heavy bag’s resistance or the platform speed bag’s steady rebound pattern. A retailer comparison similarly distinguishes a comparatively static heavy bag, a rhythmically rebounding platform bag, and a double end bag that moves through space after contact (see Wicked Boxing’s equipment comparison).
Keep heavy-bag work if you want to practice forceful combinations against resistance. Keep mitt work and coached technical sessions if you need immediate correction or intentional target changes. Use appropriately supervised sparring when your goal requires application against an opponent who can think, disrupt, pressure, and counter.
A simple buying rule is:
Choose a double end bag when moving-target control is a meaningful gap in your training. Do not expect it to replace power work, coaching feedback, or live application.
Installation may settle the decision before training goals do. A conventional double end bag needs compatible upper and lower attachment points and unobstructed space for the target and boxer. If you cannot establish an equipment-specific installation that follows the relevant manufacturers’ instructions, defer the purchase or choose equipment that does not require the same mounting arrangement.
Choose the right size, shape, material, and package
There is no universally correct double end bag. The practical choice depends on your intended drills, available installation, and access to compatible replacement parts.
Size: begin with hittable, not impressive
Larger targets provide more surface area and are commonly presented as easier for beginners to hit. They can make it simpler to establish a repeatable jab-cross rhythm or sustain a longer combination.
Smaller targets demand more precise contact and are less forgiving when a punch arrives off center. Medium targets are often presented as all-purpose options between those extremes. In his beginner tutorial, Tony Jeffries describes large bags as easier, small bags as more demanding, and medium bags as versatile (watch Tony Jeffries’ beginner double end bag tutorial).
A smaller bag does not automatically produce better boxing ability. It increases the precision required for that particular drill; transfer to sparring still depends on broader technical and tactical practice.
Shape: match the target to the drill
Common forms include:
- Round or conventional targets: Suitable for general head-level straight punches, hooks, combinations, defense, and movement.
- Slim targets: Reduce the hittable area and place more emphasis on accurate contact.
- Hourglass or double-section designs: Provide upper and lower visual targets for level-changing combinations.
- Head-and-body designs: Make high-low sequences easier to organize.
A two-section or hourglass bag may be useful when head-body combinations are a priority. The narrow center or bungee can act as a visual reference, but it is not an anatomically realistic torso. It does not reproduce human width, depth, angle, movement, or defensive reactions.
Material: compare construction, not labels alone
Synthetic and leather models are widely available. The supplied evidence does not establish that either category is inherently faster, safer, more durable, or better value.
Instead, compare:
- Seam construction
- Reinforcement around upper and lower loops
- Bladder access
- Surface consistency
- Availability of correctly sized replacement bladders
- Compatible replacement cords
- Mounting instructions
- Warranty terms
A leather label or high price does not prove superior construction. A lower-priced synthetic target is not necessarily unsuitable for occasional home use.
Goal-to-choice matrix
| Primary goal | Practical starting choice | Reason |
|---|---|---|
| Beginner control | Medium or larger general-purpose target | More hittable area while learning the return path |
| All-around use | Medium conventional design | Supports straight punches, combinations, defense, and movement |
| Precision practice | Smaller or slimmer target | Requires more accurate contact |
| Head-body sequences | Hourglass or two-section design | Provides separate visual target zones |
| Longer combinations | Medium or larger target with controlled travel | Makes rhythm easier to sustain |
This is a starting framework, not a performance guarantee. Cord selection and installation can make two similarly sized bags behave very differently.
Package checklist
Before ordering, verify whether the package includes:
- The bag
- Access to a replaceable bladder
- Upper and lower cords or bungees
- Carabiners, clips, swivels, or other connectors
- Upper anchor
- Lower anchor
- Pump
- Correct inflation needle
- An approved method of adjusting installed length or tension
- Mounting, inflation, and inspection instructions
- Compatible replacement bladders
- Compatible replacement cords
- Warranty information
- Enough installed length for the intended room
- Compatibility with the planned mounting system
Do not infer package contents from photographs. In a retailer capture reviewed on September 5, 2026, Hayabusa listed one bag at $59.99 with attached shock cords, a carabiner, pump, and needle. The listing did not establish that upper and lower anchors were included (review Hayabusa’s listed package contents).
Retail category totals may also be misleading. Pages labeled “double end bags” can include anchors, cables, pumps, tie-downs, bladders, and mounting hardware. The total number of products on such a page is therefore not necessarily the number of bags available.
Compare packages line by line. A higher-priced bundle may cost less to install if it includes compatible cords and inflation equipment. A cheaper target may require several separate purchases. Neither fact establishes quality; it changes the total cost and complexity of setup.
Understand mounting height, cords, tension, and rebound
A double end bag’s behavior comes from the complete system, including:
- Bag weight and shape
- Inflation
- Cord material and elasticity
- Cord thickness and resistance to stretching
- Installed cord length
- Installed tension
- Upper and lower geometry
- Symmetry between both ends
- Punch direction and force
Two concepts are often confused:
- Cord properties are inherent characteristics such as elasticity, thickness, construction, and resistance.
- Installed tension is how tightly that cord is stretched in the actual setup.
A light, highly elastic cord can be installed tightly. A heavier cord can be installed with more slack. The two systems may behave differently even if they look similarly taut. ExpertBoxing’s setup guide makes this distinction and recommends matching cord characteristics to the bag before using installed tension to shape the drill (see ExpertBoxing’s configuration discussion).
What tighter and looser setups generally do
A tighter configuration generally produces a quicker, more restricted rebound. The target stays within a narrower travel area, although its speed can make timing demanding.
A looser configuration generally permits wider and less predictable movement. That may create more repositioning and defensive opportunities, but too much travel can make rapid combinations impractical.
“Looser” is therefore not automatically easier, slower, or more advanced. A bag that travels a long distance may be slow to return but difficult to control. A tightly mounted bag may stay close while rebounding quickly.
For a beginner, the objective is not a universal tension setting. It is a controllable return path:
- A light jab should move the target.
- The target should return in time for a deliberate punch or defensive response.
- It should not remain nearly motionless.
- It should not travel so far that every punch becomes a chase.
- Any adjustment should stay within the equipment manufacturer’s permitted method and range.
If you cannot land light jabs and crosses without leaning or lunging, reduce the drill difficulty. Depending on the equipment instructions, that may mean changing the approved adjustment, choosing a larger target, lowering punch force, or simply waiting longer for the return.
How high should the bag be?
Published coaching preferences vary. Tony Jeffries favors approximately chin height, slightly below head level. ExpertBoxing describes a chest-to-chin range and expresses a preference for chest height. Hayabusa’s commercial training article recommends shoulder height. These are coaching or manufacturer preferences, not a universal mounting standard.
For general head-level practice, position the target within the product’s permitted setup so that you can strike it from a normal stance without lifting your shoulders unnaturally, bending at the waist, or reaching. If several people share a fixed installation, the selected height will be a compromise.
A simple control check
After the equipment has been installed according to its instructions:
- Stand in your normal stance at comfortable punching distance.
- Touch the center with a light lead-hand jab.
- Let it leave and return without throwing again.
- Observe whether the return line is manageable.
- Repeat with a light rear-hand cross.
- Try a relaxed one-two.
- Confirm that you finish balanced with both hands back at guard.
This is a training-control check, not a structural inspection or measurement of rebound speed.
A medium or larger target with controlled movement is often a practical starting point. Once its basic path is manageable, change one training variable at a time. For example, allow slightly more movement while retaining the same target, or switch to a smaller target while preserving the existing rebound behavior.
Changing bag size, cord type, height, tension, and punch speed simultaneously makes it difficult to identify why the drill became harder.
Unequal upper and lower geometry or mismatched cords may contribute to uneven movement, but that observation is not a basis for improvised structural modification. Compare the setup with the bag, cord, anchor, and hardware instructions. If the cause is unclear, ask the relevant manufacturer or a qualified installer to assess it.
The supplied evidence does not establish universal anchor load ratings, minimum clearance dimensions, inflation pressure, or whether a portable weighted lower anchor is appropriate for a particular property. Those questions must be resolved for the specific equipment and installation.
Installation and pre-session safety checklist
A complete setup may require:
- Inflated double end bag
- Compatible upper and lower anchors
- Compatible elastic cords or bungees
- Approved attachment hardware
- Pump and correct needle
- Manufacturer-approved adjustment components
- Open space around the rebound path
- Space for the boxer to step and pivot without contacting nearby objects
Follow the instructions supplied by the bag, anchors, cords, and hardware manufacturers. This guide cannot determine whether a ceiling, floor, beam, bracket, fastener, portable weight, or other supporting structure is suitable. If the structure or installation is uncertain, have it assessed by someone qualified to evaluate that specific mounting situation.
Tony Jeffries notes that a heavy weight can serve as a lower anchor in some circumstances. That coaching observation is not a general installation recommendation. Whether a portable anchor is suitable depends on the product instructions, attachment method, floor, geometry, and actual installation.
Before every session
Because the supplied evidence does not provide a universal inspection standard, use the relevant manufacturers’ instructions as the controlling checklist. At minimum, visually compare the setup with those instructions and confirm that:
- The upper and lower attachments remain in their intended positions.
- Connectors are arranged and closed as directed.
- Cords do not show obvious wear or damage.
- The bag’s loops and surrounding stitching do not show obvious deterioration.
- The bag remains inflated as intended.
- The target hangs in its intended alignment.
- The rebound path and footwork area are unobstructed.
As a conservative stop rule, do not continue if an anchor moves, a connector loosens, a cord visibly frays, the target suddenly travels abnormally, or the bag loses air rapidly. Refer the problem to the applicable manufacturer or a qualified installer rather than improvising a repair.
Hayabusa’s commercial training guidance recommends wearing boxing gloves during double end bag work, but it does not establish a universal glove type, wrapping method, or injury-prevention prescription (read Hayabusa’s training guidance). Individual hand protection and training intensity are better discussed with a coach who can assess the boxer and session.
No remote checklist can certify an installation. Written instruction also cannot replace appropriate equipment, product-specific directions, qualified installation advice, or in-person coaching.
Beginner technique: control the return before adding speed
The first objective is not to keep the target moving indefinitely. It is to strike without surrendering stance, guard, or distance.
Begin in a stable boxing stance:
- Feet positioned so you can move in any direction
- Knees relaxed rather than locked
- Weight balanced
- Chin controlled
- Hands at guard
- Elbows organized rather than flared
- Eyes on the target
For an orthodox boxer, the left hand is normally the lead hand and the right is the rear hand. For a southpaw, those sides reverse. The instructions below use lead hand, rear hand, lead side, and rear side so they apply to both.
Step 1: lead-hand jab
Touch the center with a light, short jab and bring the hand immediately back to guard. Do not chase the target while it moves away.
Let it return. Jab again when it re-enters range, or allow it to pass and reset.
Useful cues include:
- “Touch, recover, watch.”
- “Meet the return.”
- “Finish at guard.”
- “Stay over the feet.”
Step 2: rear-hand cross
Once the jab is controlled, practice a single rear-hand cross. Keep the force low and recover the hand promptly.
Wait until the target returns to the appropriate range rather than leaning forward to catch it early.
Step 3: one-two
Throw a lead jab followed by a rear cross. Straight punches generally send the bag along a more predictable line than hooks, particularly when they contact near the center.
After each repetition, ask:
- Did both hands return to guard?
- Did the stance remain intact?
- Did the head drift beyond the base?
- Could I move in either direction?
- Did the target remain on a usable path?
Do not accelerate merely because the first combination lands.
Step 4: double jab-cross
Add a second lead-hand jab:
Lead jab—lead jab—rear cross, or 1-1-2.
The two jabs do not need equal force. Use them to establish timing while preserving balance. If the second jab turns into a reach, pause and restore distance.
Step 5: one-two-hook-cross
After the straight-punch path is manageable, add a lead hook:
Lead jab—rear cross—lead hook—rear cross, or 1-2-3-2.
Hooks redirect the target rather than simply sending it along a straight line. That changes the next return angle, which is why hooks belong later in the progression. Keep the hook compact and accept that the target may need to settle before the next repetition.
Common errors and corrections
Chasing the bag: You follow it as it moves away.
- Wait for the return.
- Reset your feet.
- Meet it in range rather than pursuing it.
Swinging too hard: The target flies wide and becomes unusable for the next punch.
- Reduce force.
- Shorten the punch.
- Aim nearer the center.
Reaching: Your torso moves beyond your base to make contact.
- Wait longer or take a small balanced step.
- Do not borrow distance by leaning.
Dropping the hands: A punch finishes at the chest or waist.
- Make guard recovery part of every repetition.
- Do not count contact as clean if the hand returns poorly.
Standing frozen: Your punches remain controlled, but your feet never adjust.
- Stabilize the punching rhythm first.
- Then add one small movement after the combination.
Letting rhythm excuse poor form: The target keeps moving, so you continue despite collapsing posture.
- Stop and reset.
- Continuous motion is not the objective when stance and guard deteriorate.
This stance-first sequence is consistent with Boxing Learn’s fundamentals-first approach, but it should not be interpreted as evidence that Boxing Learn has previously published specialized double-end-bag instruction. Its article on building the jab from the stance up provides relevant general context for balance, guard recovery, and avoiding the reach.
Drill progression for combinations, defense, and footwork
Progress by control rather than by raw speed or the number of uninterrupted contacts.
In the combinations below:
- 1 means lead-hand jab.
- 2 means rear-hand cross.
- 3 means lead hook.
For southpaws, the physical sides reverse, but the sequence remains the same.
Level 1: control
Use light power and reset whenever balance or target travel deteriorates.
Single jab
Strike as the target enters range, recover to guard, and observe the complete return.
Single cross
Time the rear hand without leaning. Reset between repetitions.
One-two
Use centered straight punches to keep the path comparatively predictable.
Double jab-cross
Throw 1-1-2 without allowing the second jab to pull you forward.
Short alternating punches
Alternate compact lead and rear straight punches. Keep the shoulders relaxed and stop before the rhythm forces you out of stance.
Level 1 is complete when you can maintain a clean rhythm, recover both hands, and remain ready to move. A specific hit count is not required.
Level 2: combinations
Add structured patterns:
- 1-1-2: Double jab-cross
- 1-2-1-2: Jab-cross-jab-cross
- 1-2-3-2: Jab-cross-lead hook-cross
- 1-2, reset, 1-1-2: Two combinations separated by deliberate recovery
- 1-2-1: A short sequence finishing on the lead side
Treat each pattern as a technical sequence rather than a memory test. If the first punches send the target off line, do not force the remainder. Reset and improve the earlier contact.
ExpertBoxing includes straight-punch patterns such as 1-1-2 and 1-2-1-2 in its combination drills while noting that a bag swinging too far can make quick combinations impractical (see ExpertBoxing’s organized drill examples).
Level 3: defense
Defense begins as the punch returns, not after you have watched the contact.
Use this sequence:
- Throw a controlled combination.
- Recover both hands.
- Observe the returning path.
- Perform one planned defensive action.
- Return to stance.
- Counter only if the target remains in suitable range.
Possible actions include:
- Slip toward the lead side
- Slip toward the rear side
- Catch or block behind the gloves
- Shoulder roll
- Parry with the appropriate hand
- Step outside the return path
Example drills:
- One-two, guard, slip, rear cross
- Jab, parry, jab
- One-two, shoulder roll, rear cross
- Double jab, block, lead hook
- Jab-cross, rear-side slip, lead hook
The returning bag is a positional cue, not an opponent’s genuine punch. Do not deliberately let it strike your face to make the drill seem realistic.
Judge the repetition by whether you defended from balance and whether the counter followed without reaching. Maintaining position is more useful than landing after a technical collapse.
Level 4: footwork
Begin by moving after the combination.
Throw a one-two, recover, and move one foot a few inches while the other follows to restore stance. Repeat in the opposite direction. Small steps make it easier to notice whether your base narrows, crosses, or becomes too wide.
Progress to:
- Step jab forward
- Step jab backward
- One-two followed by a lateral step
- One-two followed by a pivot
- Jab while circling toward the lead side
- Jab while circling toward the rear side
- One-two coordinated with a short advance
- Combination, defensive response, then exit
Circle in both directions.
Only after movement between combinations is stable should you try moving during them. More advanced versions can coordinate the lead foot with a jab, a rear-side step with the rear hand, or a pivot with a lead hook.
Level 5: head-body simulation
This level is easiest to organize with an hourglass or two-section bag. A narrow center may also provide a visual reference when the product is intended to be contacted there.
Try:
- Jab to the upper target, cross to the center
- Jab high, cross to the center, lead hook high
- Double jab high, rear hand to the center, lead hook high
- Jab to the center, rear cross high
- Lead hook high, rear hand to the center, lead hook high
The center is not a realistic torso. Use these as level-changing coordination drills, not anatomical simulations.
Tony Jeffries’ advanced presentation separates head-body combinations, stepping, circling, and continuous endurance work from the beginner sequence and advises learning basic control first (watch the advanced drill demonstration).
Level 6: endurance
Use continuous alternating straight punches at low power. Stay balanced and keep each hand traveling from guard and back to guard. Increase pace only while control remains intact.
Reduce the pace or stop when:
- Punches become wide
- The chin rises
- Hands stop returning to guard
- Feet cross or become fixed
- You begin chasing the target
- Contact becomes increasingly off center
- The target’s path becomes unmanageable
Training sources provide different interval formats rather than one universal prescription. Jeffries demonstrates one-minute work periods in an advanced presentation, while Evolve MMA suggests three-minute rounds with one-minute rests for competition-style boxing practice (review Evolve MMA’s round format).
Adaptable options include:
- A brief technical interval with full concentration
- Several short work periods with enough rest to preserve form
- A conventional boxing-style round for someone already conditioned for it
- Untimed practice based on a chosen number of clean sequences
Advance when you can maintain rhythm, recover the guard, remain balanced, and complete the planned defense—not merely when a timer ends.
Buying budget, total installed cost, and troubleshooting
Retail prices are snapshots, not guarantees. In the supplied retailer captures reviewed on September 5, 2026, listed bags ranged from approximately $40 to $178. Examples included an entry synthetic model at $39.99, several models around $59.99 to $89.99, and premium listings above $150. Prices, discounts, stock, shipping, taxes, and package contents can change, and price alone does not establish quality (compare the captured Ringside listings).
Calculate total installed cost
Use this formula:
Total installed cost = bag + cords + upper anchor + lower anchor + attachment hardware + pump and needle + shipping and taxes + any qualified installation work + expected replacement parts
Some terms may be zero because the component is included. Confirm that from the written package description rather than assuming.
Possible replacement purchases include:
- Bladder
- Upper or lower cord
- Manufacturer-approved connectors
- Tie-down components
- Compatible mounting hardware
Replacement parts are not necessarily universal.
Accessory prices illustrate why the bag price alone can be misleading. In a TITLE Boxing category capture reviewed on September 5, 2026, bags appeared alongside a $9.99 bladder, $6.99 cable, tie-downs from $19.99 to $29.99, a $39.99 anchor, and a $19.99 floor-and-ceiling mount (see TITLE Boxing’s mixed bag-and-accessory category). These are examples, not a required shopping list or a guarantee of current availability.
Neutral buying checklist
Prioritize:
- Target size: Is it forgiving enough for your present skill?
- Shape: Does it support general work or the high-low sequences you want?
- Construction: Are seams, loops, and reinforcement clearly described?
- Bladder access: Can the bladder be removed and replaced?
- Inflation equipment: Are the pump and correct needle included?
- Adjustability: Can the system be adjusted through an approved method?
- Cord compatibility: Are suitable cords included or identifiable?
- Anchors: Are compatible upper and lower anchors specified?
- Hardware: Are all necessary connectors included?
- Room compatibility: Does the setup fit the available height and rebound area?
- Replacement support: Are correctly sized cords and bladders available?
- Warranty: What is covered, for how long, and under which installation conditions?
- Installed cost: What will the complete usable system cost?
Seller ratings may provide anecdotal context, but they do not establish comparative durability or typical results. Give more weight to specifications, instructions, replacement support, and compatibility.
Troubleshooting sluggish rebound
Evidence-supported factors to review include:
- Excessive slack
- A cord-and-bag pairing that does not produce the intended movement
- Unequal upper and lower geometry
First compare the bag’s inflation and complete setup with the manufacturer’s directions. Inspect the cords and connectors for visible problems. Do not simply increase tension unless the relevant instructions permit that adjustment.
Troubleshooting excessive or wide swinging
Start with punch force. Use shorter, lighter punches and aim closer to the center.
Then compare the setup with its instructions, paying particular attention to:
- Intended alignment
- Upper and lower cord arrangement
- Excessive slack
- Off-center contact
- The manufacturer’s permitted adjustment range
A wider path is not necessarily a defect, but it is unsuitable for the drill if it repeatedly pulls you out of stance or enters an obstructed area.
Troubleshooting uneven travel
Stop if the target suddenly begins moving sharply to one side or in an unfamiliar pattern. Check only what the manufacturers direct you to inspect, including visible cord condition, connector position, loop arrangement, and alignment.
Do not continue with a moving anchor or visibly damaged cord. Resume only after the cause has been addressed through the relevant manufacturer’s guidance or a qualified assessment of the installation.
Troubleshooting air loss
If the bag loses air, follow its product instructions and determine whether the manufacturer sells a correctly sized replacement bladder.
The final buy-or-defer test
Buy a double end bag if:
- Moving-target practice matches your training goal.
- Compatible mounting options are identifiable.
- The supporting structure and installation can be verified.
- The room has an unobstructed training area.
- You can afford the complete setup.
- Replacement cords and bladders are identifiable.
- You are willing to begin with controlled technique rather than power.
Defer the purchase if:
- A suitable installation cannot be established.
- Package requirements remain unclear.
- Compatible replacement parts cannot be identified.
- The target would rebound into walls, furniture, people, or fragile objects.
- Your primary goal is maximum-power punching.
- You expect the equipment to replace coaching or sparring.
Frequently asked questions
What size double end bag is easiest for a beginner?
A medium or larger target is generally the easiest starting point because it offers more hittable area than a small, slim target.
Size is only one variable. Cord properties, installed tension, inflation, target weight, and geometry also affect difficulty. Begin with a setup that lets you land light straight punches without reaching, then reduce target size only after you can preserve stance, rhythm, and guard.
How high and how tight should a double end bag be?
Published preferences range from approximately upper-chest to chin height; there is no universal setting. Position the target within the manufacturer’s permitted arrangement so that you can punch from a natural stance without excessive shoulder lift, leaning, or altered punch lines.
Tighter configurations generally create quicker, more restricted rebounds. Looser configurations permit wider, less predictable movement and may make rapid combinations difficult. For beginner work, aim for a controllable return that responds to light punches without becoming nearly static or traveling excessively.
Can a double end bag replace a heavy bag or sparring?
No. It serves a different role.
A double end bag provides a moving target for punch coordination, guard recovery, distance, defense, and footwork. A heavy bag provides more resistance for forceful punches and committed combinations. Sparring adds an opponent who can observe, decide, pressure, feint, and counter.
Use the double end bag as one component of a broader program rather than as a replacement for coaching, mitts, heavy-bag work, partner drills, or appropriately supervised sparring.
What equipment is needed for a complete double end bag setup?
A complete setup may require:
- Inflatable double end bag
- Compatible upper and lower cords
- Compatible upper and lower anchors
- Approved attachment hardware
- Pump and correct needle
- Approved adjustment components
- Adequate open space
- Access to correctly sized replacement cords and bladders
Package contents vary. Verify every component before ordering and follow the instructions for each part of the system. If the supporting structure is uncertain, seek a qualified assessment rather than improvising an attachment.
Why is my double end bag swinging too far, rebounding slowly, or losing air?
For excessive travel, reduce punch force and aim nearer the center before changing the setup. Then compare alignment, slack, cord arrangement, and adjustments with the manufacturer’s instructions.
For slow rebound, review inflation, installed slack, cord compatibility, length, and upper-lower geometry. For air loss, follow the product instructions and identify a compatible replacement bladder rather than assuming parts are universal.
Stop using the equipment if an anchor moves, hardware loosens, a cord visibly frays, travel changes abruptly, or air loss is rapid.
Conclusion
Choose a double end bag according to the movement skill you want to practice and the feasibility of a complete, equipment-specific installation—not promotional claims or bag price alone.
A practical beginner path is to verify the package and mounting requirements, start with a controllable medium or larger target, and learn light jabs, crosses, and one-twos before adding hooks, defense, footwork, and endurance. Advance only while balance and guard recovery remain consistent, and keep heavy bags, mitts, coaching, and sparring in their distinct roles.