
Build a Balanced Base You Can Move, Check and Strike From
Use a shoulder-width base, soft knees, high guard and mobile weight, then test four-direction steps, leg lifts and clean resets.
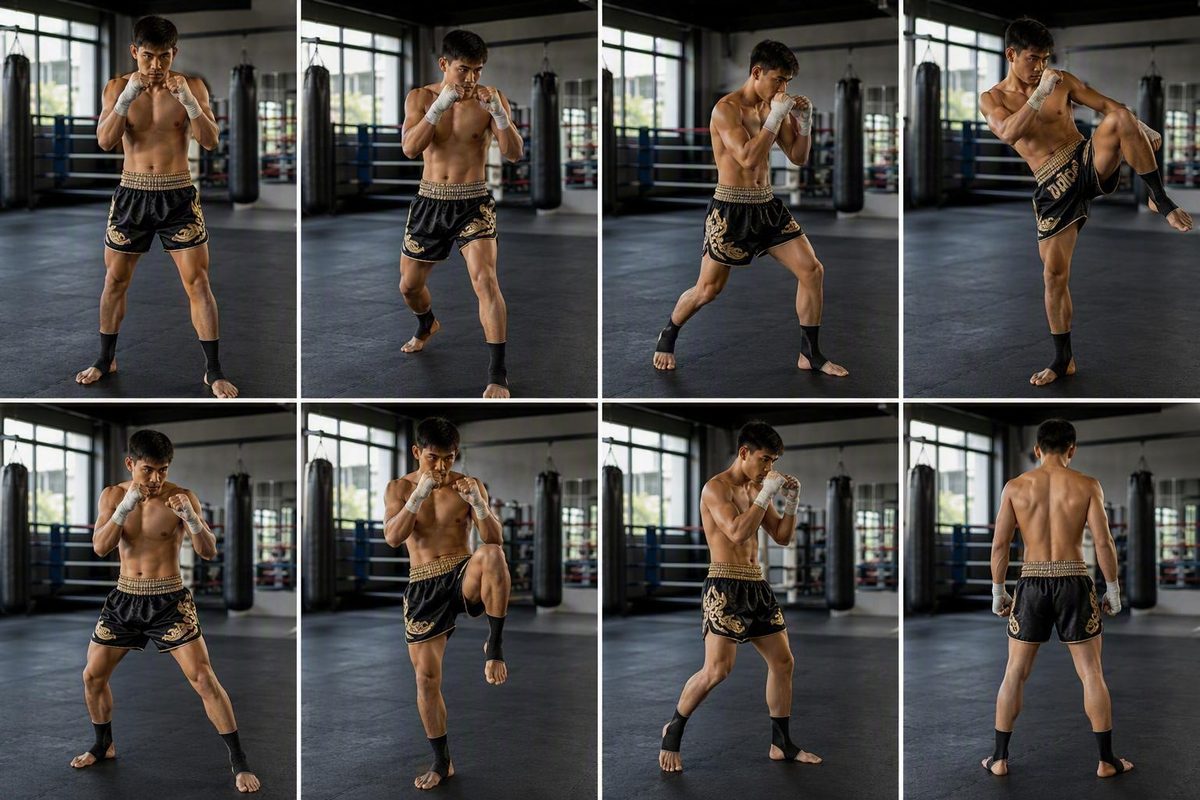
A practical beginner Muay Thai stance uses a roughly shoulder-width base, soft knees, an upright and relaxed torso, a high guard, and mobile weight. It should feel stable without rooting you to the floor: you should be able to step in any direction, lift either leg, strike, defend, and recover without a large preparatory lean.
Treat this as a neutral starting point, not a rigid pose. Exact width, foot angle, guard shape, and weight distribution vary with your anatomy, range, tactics, and coaching system. A qualified Muay Thai coach should refine those details as you progress.
Related: The Jab, Built From Stance Up.
The basic Muay Thai stance in seven steps
Set up slowly in front of a mirror:
- Choose your lead side. Most right-handed beginners start with the left side forward; most left-handed beginners start with the right.
- Separate your feet to roughly shoulder width. Leave lateral space between them rather than placing both feet on one narrow line.
- Step your dominant-side foot back. Create enough front-to-back distance for stability without stretching into a lunge.
- Point the lead foot generally toward your opponent. A small natural turn is fine.
- Angle the rear foot outward comfortably. Do not force a prescribed angle that twists your knee, hip, or ankle.
- Soften both knees. Keep them unlocked and ready to absorb a step or weight shift.
- Raise your guard. Keep your hands high, chin lowered, and elbows close enough to protect your ribs.
From there, organize the upper body. Keep your torso upright instead of leaning over the lead knee. Relax your shoulders and lower your chin without pressing it into your chest or obstructing your vision. Your hands protect the head while your elbows help cover the body. Exact hand height and palm orientation differ between coaching systems.
A slightly raised rear heel and approximately even, mobile weight are useful starting cues, not requirements that remain fixed through every action. ONE Championship’s beginner stance guide begins with even weight before allowing technique and circumstances to change it. Other instructional systems teach a modest rear-leg bias, showing why function matters more than forcing one universal split.
The stance should feel stable but not planted. Take one small step in each direction, then briefly lift each leg. If you must sway, straighten your knees, drop a hand, or make an obvious preliminary weight shift, adjust the base.
Feet-to-head mirror checklist
- Feet roughly shoulder-width apart
- Space between the feet both laterally and front to back
- Lead foot generally facing forward
- Rear foot angled outward comfortably
- Rear heel relaxed or slightly raised
- Weight mobile rather than trapped over one leg
- Knees soft
- Hips and shoulders neither completely square nor sharply side-on
- Torso upright and relaxed
- Elbows near the ribs
- Hands high
- Chin lowered without blocking vision
This checklist gives you a workable base, not one compulsory shape. Limb length, joint mobility, coaching preferences, range, and tactical purpose can all change the details.
Orthodox, southpaw and the square-to-side-on continuum
Orthodox means the left foot and left hand lead, with the right side behind. Southpaw means the right foot and right hand lead, with the left side behind.
Right-handed beginners commonly start orthodox, while left-handed beginners commonly start southpaw. That convention places the dominant hand and leg at the rear, but it is not an absolute rule.
Set up each stance as follows:
- Orthodox: left foot forward and right foot back; left hand leads while the right hand guards behind it.
- Southpaw: right foot forward and left foot back; right hand leads while the left hand guards behind it.
The remaining instructions mirror from one stance to the other. Point the lead foot generally toward your opponent, angle the rear foot outward comfortably, soften both knees, and keep the guard high.
Muay Thai generally uses a squarer orientation than boxing because it must accommodate kicks, checks, knees, elbows, and clinching as well as punches. That does not mean you should stand completely square. Think of body orientation as a continuum.
Turn too far side-on and some kicks, checks, and rear-side movements become less direct. Stand excessively square and you expose more of the front of your body while potentially losing the staggered base needed for controlled forward and backward movement. Begin slightly angled, then let your coach adjust the position.
Why not copy a boxing jab stance unchanged?
A boxing stance is organized around punching and defending punches. It may use a more bladed body position and different weight placement. Muay Thai must also leave room for checks, teeps, round kicks, knees, elbows, and clinch entries. Keep the useful principles—balance, guard, soft knees, and disciplined footwork—but adapt the geometry to the larger set of weapons.
Choose stance width and weight by function, not a fixed formula
Near-even, mobile weight is a practical neutral baseline because it gives a beginner access to both legs and several directions. Some coaches instead begin with a mild rear bias to lighten the lead leg. Neither cue should become a permanent freeze.
Published coaching frameworks range from approximately even weight to a rear-biased starting position. Iron Strong Academy’s comparison of stance functions uses specific percentage splits, but these are instructional categories rather than universal measurements.
| Position | Possible benefit | Trade-off | Functional test |
|---|---|---|---|
| Neutral or near-even | Access to either leg and several directions | A technique may require a small controlled shift | Lift either leg and step either way without a large lean |
| Slightly rear-weighted | Lightens the lead leg for a check or teep | Can slow access to the rear leg or encourage leaning back | Lift the lead leg, then the rear leg, without an obvious reset |
| Temporarily front-weighted | Can support pressure or free the rear leg | Persistent loading makes the lead leg harder to lift | Raise the lead leg without first rocking backward |
| Parallel or grounded clinch-oriented base | Creates a compact close-range platform | Less suitable for unrestricted long-range movement | Step out cleanly and recover the staggered base |
Rear weighting can make lead-leg checks and teeps more accessible. Too much rear loading, however, may leave the rear leg slower to lift or make the torso lean away. Persistent front loading can make the lead leg harder to raise, although a temporary forward shift may support pressure or free the rear leg for an attack. These are coaching trade-offs, not guaranteed outcomes.
Width brings its own compromises. An excessively wide base can slow movement and weight transfer. An overly narrow stance—or one with both feet aligned like a tightrope—reduces lateral stability and can obstruct the rear kick’s path. Move one foot slightly, repeat the functional test, and notice whether you can step and lift both legs more cleanly.
Most importantly, distinguish deliberate redistribution from a persistent balance error. Weight must shift during punches, kicks, checks, and knees. The problem is not the shift itself; it is becoming stuck, visibly winding up, or failing to recover afterward.
Move without losing the stance
Use one simple directional rule:
- Advancing: lead foot first
- Retreating: rear foot first
- Moving sideways: nearest foot first
Apply that rule in four directions:
- Forward: move the lead foot a short distance, then bring the rear foot forward only far enough to restore your original base.
- Backward: move the rear foot back, then let the lead foot follow until the original spacing returns.
- Toward the lead side: move the lead-side foot outward, then slide the trailing foot in the same direction to restore your stance width.
- Toward the rear side: move the rear-side foot outward, then let the lead foot follow.
The trailing foot should never pass over, behind, or onto the same line as the first foot. It follows only far enough to rebuild the base.
Keep every step small and controlled. Do not lunge, cross the feet, click them together, or allow them to settle on a tightrope-like line. The second foot restores the stance; it does not overtake the first.
Your guard, chin position, upright posture, and soft knees should survive the step. If your hands drop whenever your feet move, reduce the speed until the upper and lower body remain connected.
The same principle applies after a technique. A punch, kick, check, or defensive action temporarily changes the stance. Recover to a position from which you can immediately attack, defend, or move again. This is the reset principle: do not pause at the endpoint of a technique with your feet or guard displaced.
Four-direction floor drill
- Begin in stance without throwing strikes.
- Take one controlled step forward.
- Pause and check your foot spacing, knees, posture, and guard.
- Take one controlled step backward and audit the stance again.
- Repeat once toward each side.
- Complete several slow cycles without increasing the step length.
The pause makes the drill useful. It exposes whether the base survives movement instead of allowing speed to hide errors.
A functional stance self-audit
Judge your Muay Thai stance by what it allows you to do, not by whether it matches one exact picture.
Try these five controlled checks:
- Step once in every direction without crossing or aligning your feet.
- Briefly lift the lead leg as though beginning a check.
- Lift the lead leg as though beginning a teep.
- Lift or initiate movement with the rear leg without making a large preliminary shift.
- Rehearse one slow punch or kick, then return to the same guarded base.
These are coaching self-checks, not validated performance tests. They can expose obvious restrictions, balance errors, and unnecessary preparatory movement.
| Fault | Observable sign | Low-speed correction |
|---|---|---|
| Feet too wide | The second foot drags and direction changes feel slow | Bring the feet slightly closer and repeat single steps |
| Feet too narrow or aligned | Lateral movement causes wobbling or the rear leg catches behind the lead | Restore lateral space between the feet |
| Locked knees | Movement begins with a bounce or upper-body dip | Soften both knees and keep your height quiet |
| Excessive front loading | The lead leg will not lift without rocking back | Recenter the hips between the feet |
| Excessive rear loading | The rear leg feels trapped or the torso leans away | Bring the chest upright and move the weight closer to center |
| Crossed feet | One foot passes over or behind the other | Shorten the first step and let the nearest foot lead |
| Large steps | The base stretches or the feet come together | Reduce the step length |
| Flared elbows | The ribs remain visibly open | Relax the shoulders and bring the elbows nearer the torso |
| Dropped hands | The guard falls during steps or resets | Slow down and keep the hands at guard throughout |
| Forward leaning | The head travels beyond the lead knee | Step for range instead of reaching with the torso |
| Failure to reset | The feet or hands remain displaced after a technique | Pause after each repetition and rebuild the base |
Losing balance, sacrificing the guard, or needing a visible preliminary shift means some part of the setup needs adjustment. Change the smallest relevant detail—width, angle, posture, or weight placement—then repeat the test.
Progress from static stance to technique
Build complexity only while the base remains organized:
- Static mirror checks: inspect the feet, knees, torso, elbows, hands, and chin.
- Four-direction stepping: take small steps and restore your original width.
- Controlled pivots: turn slowly without twisting the upper body ahead of the base.
- Lead-leg checks: lift and replace the leg without leaning or dropping the guard.
- Teeps: rehearse the chamber and controlled return before adding speed.
- Moving shadowboxing: combine simple steps with single strikes.
- Simple combinations: use short sequences rather than long, hurried chains.
- Immediate recovery: finish every repetition in a stance that permits another action.
At every stage, prioritize balance, relaxed posture, guard position, and a clean reset over speed or volume. If fatigue causes your feet to cross, knees to lock, or hands to fall, slow down, shorten the drill, or end the set. Repeating a deteriorating pattern is not useful progression.
Your stance will change temporarily during a kick, check, punch, or clinch entry. A round kick, for example, requires weight to move onto the support leg while the body rotates. The goal is controlled redistribution followed by recovery—not preserving a frozen pose through the technique.
Support-foot pivoting can facilitate hip rotation and force transmission, but greater rotation also changes the load on the supporting knee and ankle. A 2026 narrative review covering 23 studies across Muay Thai and several other combat sports associated pivoted support-leg mechanics with greater impact force and increased rotational stress at the support-side joints. Because the evidence combines different sports and techniques, it does not establish one complete or universally optimal Muay Thai stance (review in Healthcare).
Add contact, fast pivots, kicks, checks, and clinch work under the supervision of a qualified Muay Thai coach. This guide provides general instruction and does not replace individualized coaching or appropriate training equipment.
Can a right-handed fighter use a southpaw Muay Thai stance?
Yes. Handedness is a common starting convention, not a restriction. A right-handed fighter can lead with the right side if the resulting stance supports balance, defense, movement, and preferred techniques.
Test southpaw slowly rather than making a permanent switch because it feels comfortable during one session. Attack lines and visual cues are reversed, so defense may initially feel less familiar. An informal practitioner discussion also describes using the opposite stance to compare alignment, but those personal observations do not establish that southpaw is generally better for right-handed fighters.
Should the rear heel always stay raised in a Muay Thai stance?
No. A slightly raised rear heel is a common beginner cue because it can keep the rear side mobile, but it is not mandatory throughout every technique. The heel may rise, settle, or pivot as range, balance, and the action change.
Do not force the heel upward so aggressively that the calf remains tense or the body tips forward. Judge the position by whether you can move, strike, defend, and recover without becoming rigid.
Is there one best Muay Thai stance for every fighter?
No. The useful fundamentals are consistent—balance, protection, soft knees, mobility, and recovery—but the exact width, orientation, guard, and weight distribution vary with anatomy, range, coaching system, and tactics.
Use the neutral stance as a starting platform, then judge each adjustment by whether you can move, check, strike, and reset cleanly.
A sound beginner stance returns to one central test: it keeps you balanced and guarded while allowing you to move or use either leg without a large preparatory shift. Build that neutral base slowly, preserve it through simple movement, and let a qualified Muay Thai coach refine the adjustable details for your body and tactics.